
dust-free wall sanding: the pass sequence
Dust-free wall sanding is not a machine you buy — it is a sequence you run. The machine and the extractor make the dust disappear, but the finish comes from the order of the passes, the grit you start at, and the check you run before moving on. This is the sequence a wall-finishing crew runs on plasterboard and joint compound, and the reasoning behind each step for buyers who need to explain the tool to the people using it.
by peter zhang · sep 23, 2026
three passes: 120, 180, 220 — flatten, feather, finish
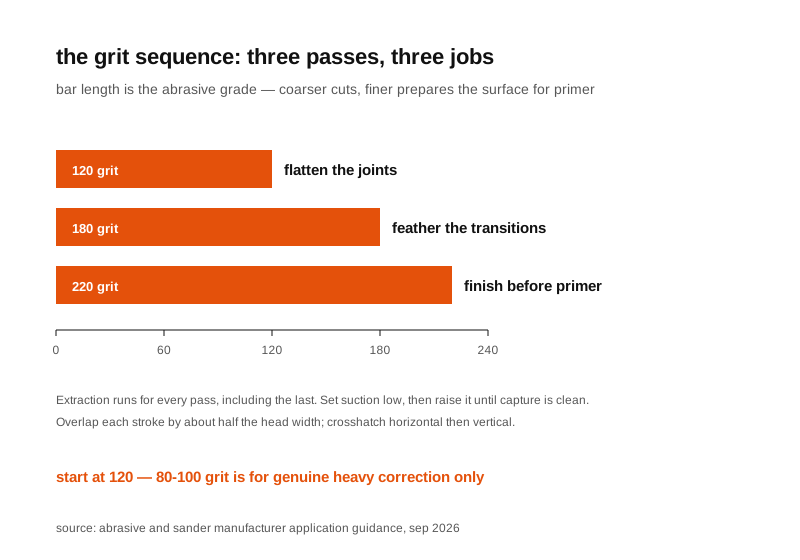
Start at 120 on plasterboard and joint compound, step to 180 to feather the transitions, finish at 220 before primer. Overlap each pass and let the head float rather than pressing. End every pass with a light held along the wall, not at it — if the surface reads flat under raking light, the sequence is done.
the sequence in one line
The sequence is 120, then 180, then 220 — three grits, three different jobs, and the reason each one exists is that the previous one left something behind. 120 removes the ridge of compound sitting proud over a taped joint. 180 feathers the edge of that removal so the transition does not read as a step. 220 removes the scratch pattern the first two passes cut into the surface, which primer will otherwise telegraph straight through to the topcoat.
The single most common mistake is starting coarser than the work requires. 80 and 100 grit exist for genuine heavy correction — a high build to flatten, a defect to remove — and using them on ordinary joint compound removes material the crew then has to put back with filler. It also multiplies the dust the extractor has to swallow, which is the opposite of the point.
start with extraction, not with grit
Before the first pass, the dust path has to be right, because a pass run without capture is a pass that has to be cleaned up and often repeated. Connect the extractor and confirm it is rated for the dust — for gypsum and silica-bearing material that means an M-class machine, not a workshop vacuum with a bag. Confirm the head is sealed and the hose is not kinked in the working position. Set suction low and bring it up until capture is clean, rather than starting at maximum: over-suction pulls the head onto the wall, raises contact pressure and produces the skipping and swirl marks that operators then try to sand out.
The regulatory reason sits behind the practical one. Where work is governed by a crystalline silica exposure limit, the dust-control setup is the compliance-critical component of the purchase rather than an accessory to it, which the dust-free wall sander guide covers in full. Running the machine without extraction also defeats the productivity argument: the crew spends the time it saved on cleanup.
pass 1: the flattening pass
The first pass is about geometry, not finish. Its job is to bring the proud compound over taped joints down to the level of the surrounding board, so the wall becomes one plane instead of a field with ridges on it. Work at 120 grit, move the head continuously, and overlap each stroke by roughly half the head width — a 180mm pad on the CI-G180 covers a lot of wall per stroke, and the overlap is what stops the pass leaving tracks at the stroke edges.
Work top-down and crosshatch: a set of horizontal strokes, then a set of vertical ones over the same area. Crosshatching removes the directional scratch pattern a single-direction pass leaves, and it finds high spots a horizontal-only pass skates over. Pressure stays light — the machine's weight is the pressure. Pressing harder does not flatten faster; it loads the abrasive, glazes it and creates hollows around the high spot you were trying to remove.
passes 2 and 3: feather and finish
The 180 pass is a blending pass. Where the first pass took compound down to board level, it left a boundary between the sanded area and the untouched surface, and that boundary will show through paint as a ring or a halo. Feathering means running the head across that boundary with light pressure until the transition is gradual rather than abrupt — the sanded area should fade out, not stop. This is the pass that most often gets skipped, and it is the one that shows up in the finished room.
The 220 pass is a scratch-removal pass, and its only job is to prepare the surface for primer. Fine scratches left by 120 and 180 grit hold primer unevenly, and the topcoat magnifies them because paint sits differently in a scratch than on a smooth field. Keep this pass light and quick, keep the extraction running, and do not chase perfection with pressure — the goal is a uniformly abraded surface, not a polished one. Abrasive type matters less here than people assume, but mesh abrasives load less and last longer in this application than paper, and they work with the extractor rather than against it.
the raking-light check that ends a pass
Every pass ends the same way: hold a light close to the wall and shine it along the surface rather than at it. Grazing light turns small flaws into shadows — the ridge over a joint, the hollow left by a heavy hand, the swirl pattern from a head held too long in one spot, the patch that was missed. It is the only reliable check, because in normal room light a wall that still needs work looks finished.
The check is also what tells you when to stop. Sanding is subtractive, and a crew that keeps going after the wall reads flat is removing material it will have to replace. If the raking light shows flat, move to the next grit; if it shows flat on the last grit, the wall is ready for primer and further passes are wasted labour.
where the machine window sits
The technique above assumes a machine that can hold a broad head flat against the wall and carry its own weight while doing it. That is the definition of the pad machines: the CI-G180 runs a 180mm hook & loop pad at 1400W with an 800–1800 r/min window at 2.5 kg, which is light enough to hold overhead for a full shift and wide enough that the overlap in a pass is easy to control. For a crew, the relevant question about the machine is not its peak power but whether the head stays flat when the operator is tired — which is where the technique either holds together or falls apart.
Grit is a consumable decision, not a machine decision, and it is worth saying plainly to end users: the machine does not care which grit is fitted. What the machine decides is how much of the wall one pass covers, how much dust the extractor sees, and how long an operator can keep the head flat — and all three of those are what separate a wall that reads flat under raking light from one that gets sanded twice.
faq
What grit should I start wall sanding at?
Start at 120 on plasterboard and joint compound, and only step to 80-100 when there is genuine heavy correction to do — a high build to flatten or a defect to remove. Starting coarser than the job needs is the most common waste in wall sanding: it removes material you then have to replace with filler, and it generates more dust for the extractor to handle. 120 blends joints and smooths the field; 180 and 220 finish and feather before primer.
Do I have to sand in three passes, or can I use one grit?
On a repaint over sound plaster you can often go straight to a finishing grit. On new board with taped joints, the three passes do different jobs and skipping one shows: the flattening pass removes the ridge over the joint, the second pass feathers the transition, and the third removes the scratch pattern the first two left. The test is not the grit count, it is the raking light — if the wall reads flat under a light held across it, the sequence is finished.
What is the raking-light check?
Hold a light source close to the wall and shine it along the surface rather than at it, so the beam grazes the plaster. Flaws that are invisible in normal room light cast small shadows and become obvious — ridges over joints, hollows, swirl marks and missed spots. It is the check that ends a pass, because it tells you whether the next grit is needed at all. Do it after every pass, not just at the end.
Do I need a different extractor for wall sanding?
You need one rated for the dust, which for gypsum and silica-bearing dust means an M-class machine, and you need it connected and running for every pass including the last one. Auto-start sockets save the operator from remembering, and an auto-clean pulse keeps the filter from loading mid-wall. Suction should be set low enough that the head floats rather than being pulled onto the surface — over-suction causes skipping and swirl marks as reliably as under-suction causes dust.
want the sequence to hold up on site?
tell us what your market sands and what its crews use now — we'll match the head and the extraction setup to the finish they are expected to deliver.
talk through the setup